I need more SPACE! I know I’m not the only one who has said that – though, admittedly, maybe not everyone is referring to storage space for their video files.
Video files, as I’m sure you know, can be HUGE. Although virtually all video is compressed in some way or another there’s continual effort to find ways to make the files smaller without losing too much quality.
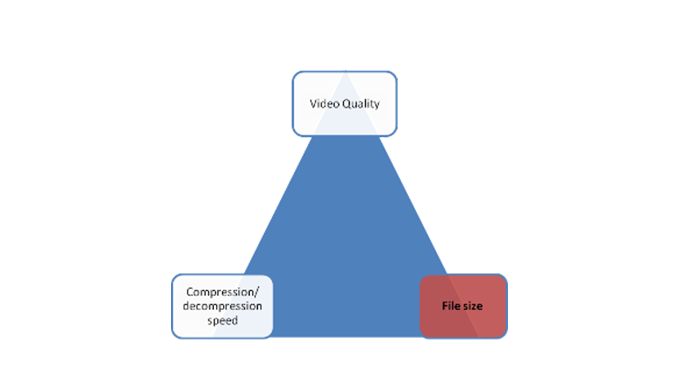
Our goal is always to create videos that effectively balance the need for a small file size, with acceptable output quality, and acceptable compression/decompression speed. (You know the old saying: “You can choose only 2”.) Your optimal export settings will depend on the source video, the desired output quality, available storage space, and of course the devices on which you’ll be watching the content. There are hundreds of settings and options you can select from – it’s a science unto itself!
 In future posts, if people are interested, I may explore some of ScreenFlow’s customizable export settings more in-depth; (let me know what you’re interested in learning more about!) but for this post, I will just talk about one side of the quality/speed/size triangle: ways to reduce your file size.
1) First, try some different Export Presets
In ScreenFlow 2, you have up to 11 preset options.
 (Note: You’ll see I have Windows Media as one of my preset options. That is because I have Flip4Mac Studio installed on my system. Without that component, you will not see this optional preset.)
Try exporting your video using some of the different options and see if your file size decreases without sacrificing too much quality.
Each preset is optimized for a certain purpose. Some, you will find, will render INCREASED file sizes. The “Lossless” preset, for example, uses a very high quality compression technique that preserves the original image quality. Depending the video source you’re encoding, this preset might give you the best quality output. But if your goal is to decrease your file size, the Lossless preset is probably not going to do it for you. If you’re planning on uploading your video to the web, try the different Web presets.
2) Reduce the dimensions of your video (width / height)
If your video will be viewed in a player optimized to 640 x 480, for example, you will save a lot of space by exporting your 1280 x 960 video file scaled down to the actual player size. You don’t need to change your source video to do this. Simply export your movie at a smaller size using the “Dimensions” settings in the Export Dialog to scale it down by a percentage.
3) Reduce the frame rate (frames per second)
A graphic on the side of a truck is a real ‘moving picture’. Video, on the other hand, is essentially a series of separate still images displayed quickly enough to fool our brain into thinking it’s seeing moving objects. “Frame rate” is the term used to specify how quickly these individual images are displayed per second (i.e. frames per second (fps)). So if you export at 20fps, that means your eyes are processing one still frame every 1/20th of a second. The higher the frame rate, the more data there is in the outputted file, the higher the file size will be.
There a lot of factors to consider when choosing the optimal frame rate, including your source video(s) and the content of your video. But the goal is to create a smooth, high quality-looking video output.
If your frame rate is too low, the video will seem to stutter or jerk – because your eye is perceiving the frames individually, rather than seeing them as continuous. But as you raise your fps, there’s a point at which your eye will not perceive any visible difference. Also, it is possible that if the frame rate is too high it could blur the details of the animation and take so much computer processing power to view that it results in the overall deterioration of your video. In this case the effect would be similar to having a frame rate that is too slow – it would appear to stop and start.
Flash’s default frame rate is 12 fps; QuickTime and AVI movies are also generally 12 fps, while motion pictures (cinema) use 24 fps, and NTSC TV is around 30 fps. Generally, 12 fps can produce good results for the web, (again, depending on your source content) but you’ll want to try some tests with your own content.
I would recommend trying 15 fps. At this rate, it does a good job giving the perception of smooth motion (in general). Also, it’s not as much information as 24 fps, but with just 3 fps more than 12fps, it looks quite a bit better.
To change your Frame Rate, select the “Customize…” button in the Export Dialog, then press the “Settings…” button in the Video area. Most codecs enable you to adjust the Frame Rate/FPS setting.
Once you’ve done some testing, let us know your results. What settings work for you for your particular application? “Comment” below so we can all share in the knowledge!
Another thing you can do is adjust the audio — if it’s spoken word you can kick the bitrate down to 64kbps and make it mono…
Now me on the other hand…
I like mysource file the highest it can be… so if you are uploading your ScreenFlow video to places like YouTube or Vimeo I like outputting things as high as I can go:
– Multi-Pass / Best Quality
– 192kpbs stereo audio
– 100% video size
– Motion Blur <— This makes a HUGE difference in your output
This gives these services better videos to render from, and will ensure you have a great video that people can get streaming. Typically my files are about 60 megs per 1 minute of video… but oh so worth it.
Hi Chris,
Yes, good point about adjusting the audio. And thanks for sharing your settings.
How nice that you have enough storage space that you don’t have to worry too much about file size :). But that goes back to that triangle that balances Speed, Quality & File Size. You’ve chosen to sacrifice small file size in favor of quality. Which works for you, but may not work for others.
Thanks! (hope you’re feeling better 🙂
Hi Lynn Elliott,
Is it possible to render files with 2 frames per second in screenflow7?
screenflow6 was having feature of adjusting frame / second
Hi Saurabh,
Yes, you can render files with 2 frames per second. Go to File > export. Click on Type=Manual and then Preset = Customize. You’ll see the Framerate dropdown. Click on that, and then you can type into that dropdown box. Hope that helps!
I’ve had good results by decreasing the Bit Rate as well.
For H.264 it’s often set on Automatic. Try decreasing it to 2400 and 1200 and notice the quality/size changes to see what you’re comfortable with.
Chris, for me 60Mb per minute would be a deal breaker. 🙁
Thanks Scott, yes, bit rate (or data rate) is a whole ‘nother area that can be tweaked to affect file size. Again, this goes back to the science of compression- there are hundreds of options, and many of them work in conjunction with each other. So, if you reduce the dimensions of your video AND restrict your bit rate, you’ll likely start seeing artifacts or blurry image quality.
But, if you have the time and inclination, it’s worth testing out a few different methods to see what works for your purposes.
Thanks Lynn, I’m feeling much better 🙂
My logic is that I don’t need the file to stay on my computer once it’s uploaded to a service like Vimeo (you can download the source file from there if/when you’d need it again)
I have found that by decreasing the key frame rate, a much smaller size can be achieved. The recommended rule of thumb to have one key frame every 5 seconds (multiply the frames per second by 5). But I have had pretty good results by even going past that recommendation (i.e. key frame every 200 or 300 frames).
What about compression? I learned from this guide: http://www.winzip.com/learn/file-compression.html how to compress files with WinZip but I haven’t tried with video files yet. Would it work or not? 🙂
Yes, Tonya, If you’re talking about further compression, that’s can be another way to reduce your file size. Handbrake is a commercial product that can help with that.
However, “zipping” your file is really only intended for compressing it so that it can be tranported or delivered somewhere. You have to uncompress it to actually watch it.